
Catchments and LID controls
Delineate subcatchments from a DEM for the model's inlets, estimate imperviousness from OpenStreetMap land use, and design and place low impact development (LID) controls.
Both tools here propose SWMM text rather than editing the project behind your back. Apply as SWMM text proposal merges the text into the project as one edit; objects with the same ID are replaced. A note at the top of the window says how many rows were added and replaced, and Edit > Undo takes it all back.
Set the coordinate system
Online elevation and land use need to know where the model is. Project > Coordinate System... (also at the top of the Catchment window) says what the map's X and Y already are: Local drawing units (no georeference) or one of WGS 84 / UTM zone 42N (EPSG:32642), WGS 84 / UTM zone 43N (EPSG:32643), WGS 84 / UTM zone 44N (EPSG:32644), WGS 84 / UTM zone 45N (EPSG:32645), WGS 84 / UTM zone 46N (EPSG:32646), WGS 84 / UTM zone 1N (EPSG:32601), WGS 84 / UTM zone 2N (EPSG:32602), WGS 84 / UTM zone 3N (EPSG:32603), WGS 84 / UTM zone 4N (EPSG:32604), WGS 84 / UTM zone 5N (EPSG:32605), WGS 84 / UTM zone 6N (EPSG:32606), WGS 84 / UTM zone 7N (EPSG:32607), WGS 84 / UTM zone 8N (EPSG:32608), WGS 84 / UTM zone 9N (EPSG:32609), WGS 84 / UTM zone 10N (EPSG:32610), WGS 84 / UTM zone 11N (EPSG:32611), WGS 84 / UTM zone 12N (EPSG:32612), WGS 84 / UTM zone 13N (EPSG:32613), WGS 84 / UTM zone 14N (EPSG:32614), WGS 84 / UTM zone 15N (EPSG:32615), WGS 84 / UTM zone 16N (EPSG:32616), WGS 84 / UTM zone 17N (EPSG:32617), WGS 84 / UTM zone 18N (EPSG:32618), WGS 84 / UTM zone 19N (EPSG:32619), WGS 84 / UTM zone 20N (EPSG:32620), WGS 84 / UTM zone 21N (EPSG:32621), WGS 84 / UTM zone 22N (EPSG:32622), WGS 84 / UTM zone 23N (EPSG:32623), WGS 84 / UTM zone 24N (EPSG:32624), WGS 84 / UTM zone 25N (EPSG:32625), WGS 84 / UTM zone 26N (EPSG:32626), WGS 84 / UTM zone 27N (EPSG:32627), WGS 84 / UTM zone 28N (EPSG:32628), WGS 84 / UTM zone 29N (EPSG:32629), WGS 84 / UTM zone 30N (EPSG:32630), WGS 84 / UTM zone 31N (EPSG:32631), WGS 84 / UTM zone 32N (EPSG:32632), WGS 84 / UTM zone 33N (EPSG:32633), WGS 84 / UTM zone 34N (EPSG:32634), WGS 84 / UTM zone 35N (EPSG:32635), WGS 84 / UTM zone 36N (EPSG:32636), WGS 84 / UTM zone 37N (EPSG:32637), WGS 84 / UTM zone 38N (EPSG:32638), WGS 84 / UTM zone 39N (EPSG:32639), WGS 84 / UTM zone 40N (EPSG:32640), WGS 84 / UTM zone 41N (EPSG:32641), WGS 84 / UTM zone 47N (EPSG:32647), WGS 84 / UTM zone 48N (EPSG:32648), WGS 84 / UTM zone 49N (EPSG:32649), WGS 84 / UTM zone 50N (EPSG:32650), WGS 84 / UTM zone 51N (EPSG:32651), WGS 84 / UTM zone 52N (EPSG:32652), WGS 84 / UTM zone 53N (EPSG:32653), WGS 84 / UTM zone 54N (EPSG:32654), WGS 84 / UTM zone 55N (EPSG:32655), WGS 84 / UTM zone 56N (EPSG:32656), WGS 84 / UTM zone 57N (EPSG:32657), WGS 84 / UTM zone 58N (EPSG:32658), WGS 84 / UTM zone 59N (EPSG:32659), WGS 84 / UTM zone 60N (EPSG:32660), WGS 84 / UTM zone 1S (EPSG:32701), WGS 84 / UTM zone 2S (EPSG:32702), WGS 84 / UTM zone 3S (EPSG:32703), WGS 84 / UTM zone 4S (EPSG:32704), WGS 84 / UTM zone 5S (EPSG:32705), WGS 84 / UTM zone 6S (EPSG:32706), WGS 84 / UTM zone 7S (EPSG:32707), WGS 84 / UTM zone 8S (EPSG:32708), WGS 84 / UTM zone 9S (EPSG:32709), WGS 84 / UTM zone 10S (EPSG:32710), WGS 84 / UTM zone 11S (EPSG:32711), WGS 84 / UTM zone 12S (EPSG:32712), WGS 84 / UTM zone 13S (EPSG:32713), WGS 84 / UTM zone 14S (EPSG:32714), WGS 84 / UTM zone 15S (EPSG:32715), WGS 84 / UTM zone 16S (EPSG:32716), WGS 84 / UTM zone 17S (EPSG:32717), WGS 84 / UTM zone 18S (EPSG:32718), WGS 84 / UTM zone 19S (EPSG:32719), WGS 84 / UTM zone 20S (EPSG:32720), WGS 84 / UTM zone 21S (EPSG:32721), WGS 84 / UTM zone 22S (EPSG:32722), WGS 84 / UTM zone 23S (EPSG:32723), WGS 84 / UTM zone 24S (EPSG:32724), WGS 84 / UTM zone 25S (EPSG:32725), WGS 84 / UTM zone 26S (EPSG:32726), WGS 84 / UTM zone 27S (EPSG:32727), WGS 84 / UTM zone 28S (EPSG:32728), WGS 84 / UTM zone 29S (EPSG:32729), WGS 84 / UTM zone 30S (EPSG:32730), WGS 84 / UTM zone 31S (EPSG:32731), WGS 84 / UTM zone 32S (EPSG:32732), WGS 84 / UTM zone 33S (EPSG:32733), WGS 84 / UTM zone 34S (EPSG:32734), WGS 84 / UTM zone 35S (EPSG:32735), WGS 84 / UTM zone 36S (EPSG:32736), WGS 84 / UTM zone 37S (EPSG:32737), WGS 84 / UTM zone 38S (EPSG:32738), WGS 84 / UTM zone 39S (EPSG:32739), WGS 84 / UTM zone 40S (EPSG:32740), WGS 84 / UTM zone 41S (EPSG:32741), WGS 84 / UTM zone 42S (EPSG:32742), WGS 84 / UTM zone 43S (EPSG:32743), WGS 84 / UTM zone 44S (EPSG:32744), WGS 84 / UTM zone 45S (EPSG:32745), WGS 84 / UTM zone 46S (EPSG:32746), WGS 84 / UTM zone 47S (EPSG:32747), WGS 84 / UTM zone 48S (EPSG:32748), WGS 84 / UTM zone 49S (EPSG:32749), WGS 84 / UTM zone 50S (EPSG:32750), WGS 84 / UTM zone 51S (EPSG:32751), WGS 84 / UTM zone 52S (EPSG:32752), WGS 84 / UTM zone 53S (EPSG:32753), WGS 84 / UTM zone 54S (EPSG:32754), WGS 84 / UTM zone 55S (EPSG:32755), WGS 84 / UTM zone 56S (EPSG:32756), WGS 84 / UTM zone 57S (EPSG:32757), WGS 84 / UTM zone 58S (EPSG:32758), WGS 84 / UTM zone 59S (EPSG:32759), WGS 84 / UTM zone 60S (EPSG:32760). Nothing is reprojected. The choice is saved in the .inp as a comment line that SWMM ignores.
Delineate subcatchments from a DEM
Tools > Catchment Delineation (DEM)... works in four numbered sections.
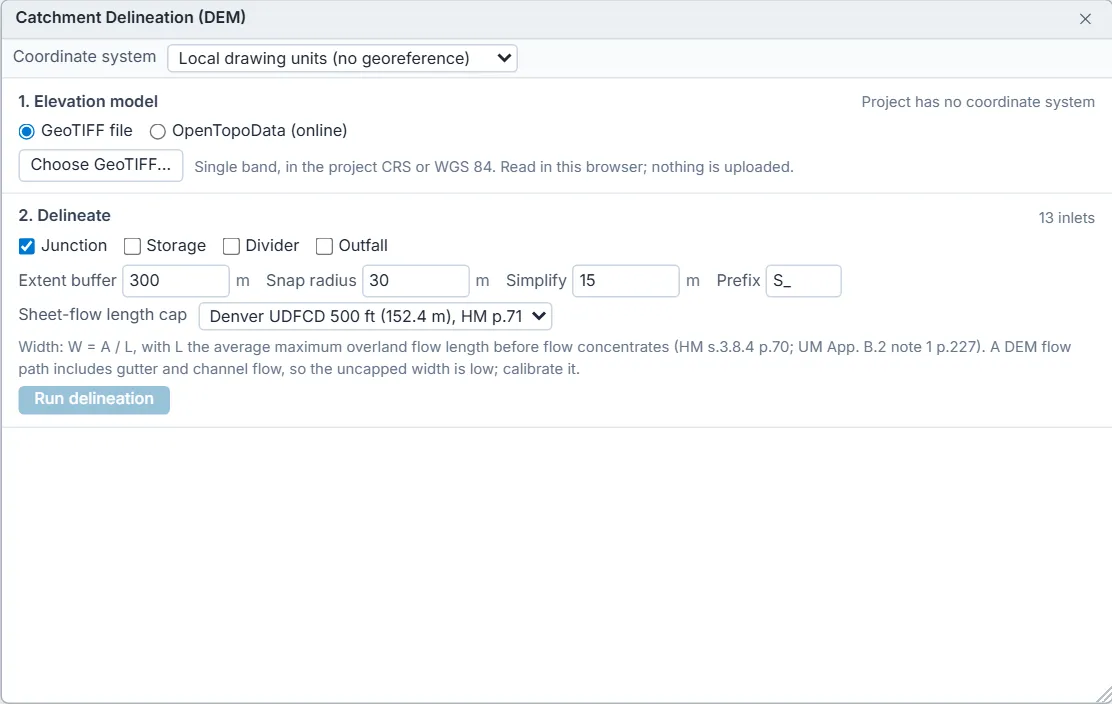
- 1. Elevation model. Either GeoTIFF file: Choose GeoTIFF... and pick a single-band GeoTIFF in the project's coordinate system or in WGS 84; it is read in the browser and not uploaded. Or OpenTopoData (online): choose the Cell size (30 m to start) and the Dataset (SRTM 30 m or ASTER 30 m), tick the box agreeing to send the model area's coordinates to OpenTopoData, a third-party service, and press Fetch elevations. The window says how many points and requests that takes, at one request per second; the cell is widened to stay within 10,000 points. The online option needs a project coordinate system.
- 2. Delineate. Tick which nodes are inlets (Junction by default; Storage, Divider, Outfall), and set the Extent buffer (300 m), Snap radius (30 m), Simplify (15 m) and the ID Prefix (S_). Choose the Sheet-flow length cap. Press Run delineation. A preview shows the subcatchments and inlets, how many DEM cells sat in depressions and were filled, and what share of the DEM drains past every inlet.
- 3. Land use (optional). See below.
- 4. Parameters. Review the table and set the rain gage, soil and infiltration, then press Apply as SWMM text proposal.
- Width is area over the overland flow length L. A DEM flow path includes gutter and channel flow, so an uncapped L gives a low width; the cap choices are No cap (longest DEM flow path); NRCS 100 ft (30.5 m), HM p.71; Denver UDFCD 500 ft (152.4 m), HM p.71. The Denver cap is the default. Calibrate the width afterwards.
- In the parameter table you can type a subcatchment's %Imperv and the overland length L used; the width follows.
- %Imperv where unset starts at 38 % (medium density residential) until land use is fetched or typed.
- Subarea values written: Manning n 0.012 impervious and 0.15 pervious, depression storage 0.05 and 0.1 in (written in mm in an SI project), 25 % zero-storage impervious; infiltration (Horton or Green-Ampt) from the soil texture you pick, with dense vegetation and soil moisture choices for Horton.
- If a new ID clashes with an existing subcatchment, the window warns you to change the prefix, or the proposal replaces it.
Imperviousness from OpenStreetMap land use
After a delineation, section 3 can fetch OpenStreetMap land use areas and building footprints for the model's bounding box from an Overpass server, and turn them into %Imperv and a runoff C per subcatchment. Choose the Residential density (High 51 %, Medium 38 %, Low 19 %), the imperviousness of Untagged area (11 % to start, open urban land) and C from range (low end, midpoint or high end), tick the box agreeing to send the bounding box to the server, and press Fetch OSM land use.
Raster layers
View > Raster Layers... shows GeoTIFF layers (a DEM, a land cover map such as ESA WorldCover, or imagery) under the network, from a file or a URL. Pick a loaded raster, then: Elevations from this DEM sets manhole ground levels from it, for every manhole or only where the value is 0, either keeping the invert and setting the maximum depth or keeping the maximum depth and moving the invert; Imperviousness per subcatchment and Mean slope per subcatchment set those values from a land cover map or a DEM. Each shows a preview before it changes the model, and applies as one edit. Raster layers last for this session only, because the .inp file cannot hold them.
LID controls
Tools > LID Controls... designs SWMM LID controls and places them in subcatchments. The control types are: Bio-retention cell (BC), Rain garden (RG), Green roof (GR), Infiltration trench (IT), Permeable pavement (PP), Rain barrel (RB), Rooftop disconnection (RD), Vegetative swale (VS).
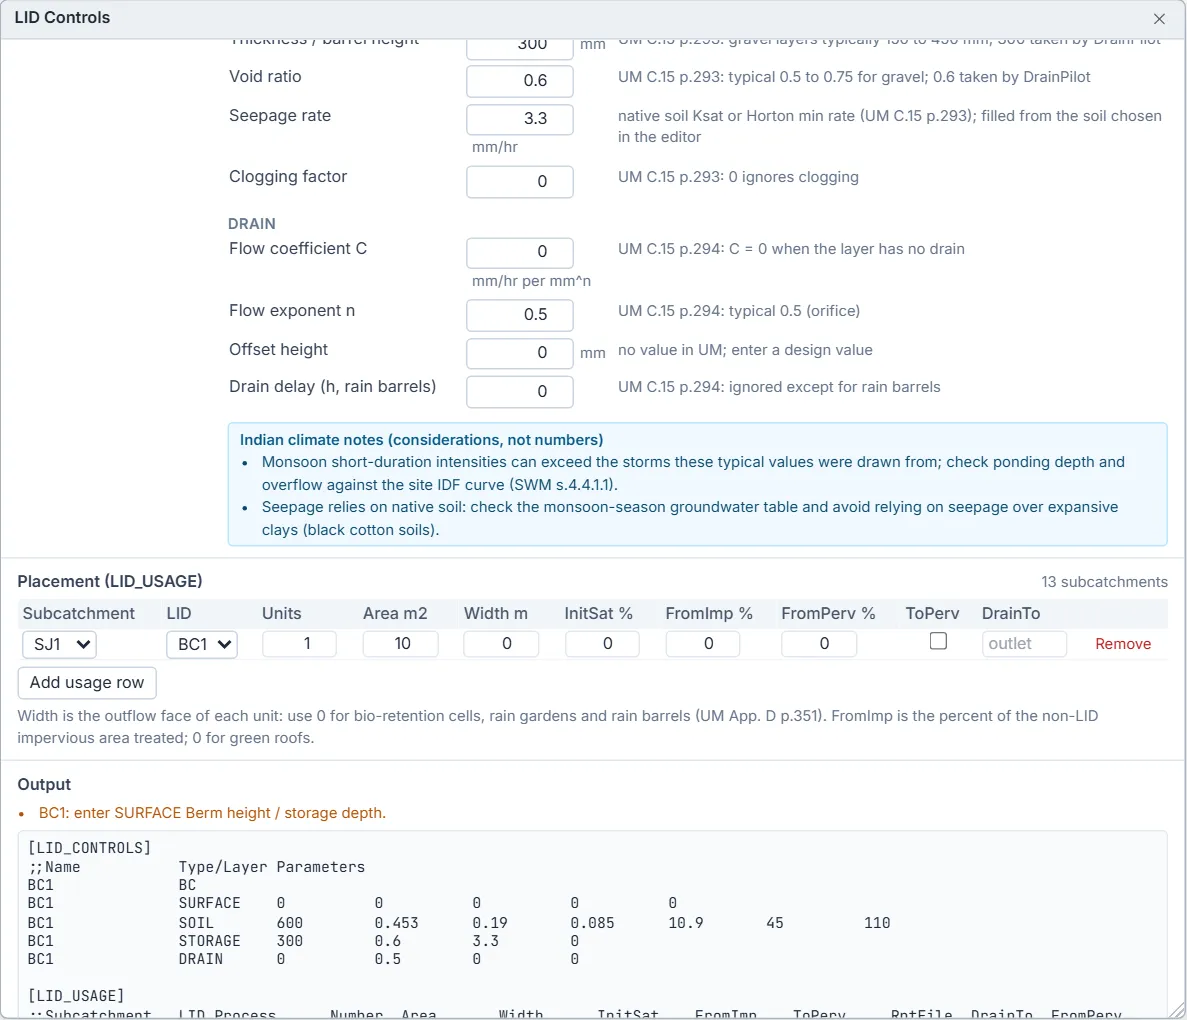
- Pick the Native soil first: it sets the seepage rate of new controls from the soil's conductivity, shown in mm/hr.
- Pick a type and press Add control. Each control gets an ID such as BC1; type a new Name to change it.
- Fill in the layer values. Each value shows its unit and where the default came from (the SWMM 5.2 User's Manual); a value with no default is outlined in amber and must be entered. A blue box lists Indian climate notes for that type.
- Under Placement (LID_USAGE), press Add usage row for each subcatchment that gets the control: the number of Units, Area m2 of each unit, Width m of its outflow face, initial saturation, the percent of impervious (FromImp %) and pervious (FromPerv %) area it treats, ToPerv, and DrainTo.
- Read the SWMM text under Output. Fix any problem listed there, then press Apply as SWMM text proposal.
Use a width of 0 for bio-retention cells, rain gardens and rain barrels, and FromImp 0 for green roofs. Values are typed in SI; in a US-units project they are converted when the text is written. To compare with and without LID, save both as scenarios: see Calibration and scenarios.